banner background

mmici21

Friday, January 17, 2014

Valentine's Door Decor .... XOXO

 
a.) I love our lime green front door!
b.) I love this blue frame as a "wreath"
c.)I am just loving everything today!
 
I so much enjoy this tealy blue picture frame that I found at a local thrift store and painted up.  So much that I have pretty much found a way to use it every season this past year.. 2013 that is, as well as into 2014. 
 
You may remember my introduction to the front door a few posts ago...
 
 
as well as the posting with this frame...


Well... now its getting towards Valentine's Day, and what better way to greet guests then with a hug and a kiss? :) (tee hee... don't make me blush.... - dropping a little coy eye flutter here)
 
For this project I wanted to use foam core to make the letters dimensional... and because obviously I like to punish myself with an exacto knife  - OUCH!!!  I refrained from showing a photo of my owie... *sniff, sniff*
 
Supplies Needed:
Elmers Foam Core
Exacto Knife
Elmers Rubber Cement
String
Scrapbooking Paper - mine was 12x12
 
 
I designed the size of the letters with Word Art in Microsoft Word...printed...
 
I cut the letters out of the paper, using them as a pattern, traced them onto the foam core.
Now the real "Fun"  work begins...
Cut the letters out of the foam core... please be VERY carefully with the exacto knife


I used the same pattern to cut out the letters from the scrapbooking paper...
when they were cut out, I used Elmer's Rubber Cement to glue the paper to the foam core.


Once the glue had dried, I attached string to the back of the letters and tied them to the frame! 
Viola!  Instant door décor!


Hugs and Smooches to you all!  May you always be greeted with love everywhere you go!

Thursday, January 16, 2014

Thrift Store Thursday!!! Low down on the goods....

I freaking LOVE shopping at the local thrift stores!!!
They offer great opportunities... at a low cost...  the chance to repurpose, to try a new look, to dig thru all the excess to find that ONE magic item that speaks to you (if I may quote the Pier One Holiday commercials)

I also like what they contribute to the communities they are in. :)  Everyone wins!

I thought I would share my magically wonderous finds with y'all!!!

coffee cup holder will be a nice addition for my jewelry organization area... to hang some necklaces on.  I will need to put this together and paint.  This cost $1.99

I think I will spray paint this heart candle holder watermelon pink and place it on our mantle for Valentine's Day.  This was $1.99


A couple of knick knacks that I can place as added embellishments for layering, they were .99 a piece


A fun denim vest to add a layer up with tank tops along with my maxi skirts... this was $2.99 
I pinned a couple of ideas of outfits with denim vests on my style board on Pinterest.
 
 
along with several other outfit ideas! 

I thought this little bird would be cute painted a beautiful blue.  I can and will use this for spring and summer décor.  This cost $1.99

 
I adored this sweatshirt "Dream in Color" with the melted crayons...  I think this will look adorable with some leggings - great cozy day sweatshirt for $3.99

 
I saw a gorgeous outfit with a black and white check shirt paired with a pencil skirt on Pinterest... I think this shirt is pretty comparable, and it's Ralph Lauren to boot!


My last purchase was some delightful wide legged boat jeans from Eddie Bauer.  I loved the scooped pockets, the width of the legs and the ADORABLE button detailing on the pockets.  Very comfortable, and classy at the same time!  Price is still great, at $8.99!!!! 
 
I spent around $20.00 at the local Goodwill in Oskaloosa, enjoyed my adventure browsing and using my imagination to see things not just for what they are, but for what they could be.
 
How about you, any thrift stores in your world that are totally rocking with great deals and buys?
 

Wednesday, January 15, 2014

We not Me watercolor - work in progress...

Have you ever had a statement make a HUGE impact on you?
Has it ever made you re-evaluate your life, your mental thought process etc.?

Now... what I am about to share with you might not be that striking or impactful - or it could be - if you enjoy the simplicity of statement.

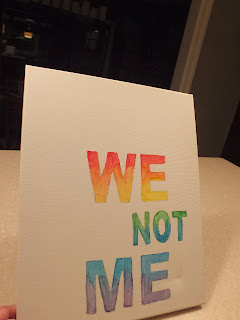
 "WE NOT ME" 
 
 - I enjoy this statement because its a reminder that there is more to life than yourself, think of others, put their needs before yours. 


Also... please pardon my photos - my camera settings were a tad off... I really need to work on that!

This watercolor is a work in progress  - so please pass on judging me too harshly... I just have the basics on here and am working towards finishing it up :) 

 
Supplies needed:
Watercolor set - raid your kiddos craft closet.
Canvas
3 small paint brushes
 - one for block coloring (stiff bristles with angle)
- 2 for blending
a bowl of water
Pencil for tracing out letters onto canvas
statement to paint
exact-o knife

 
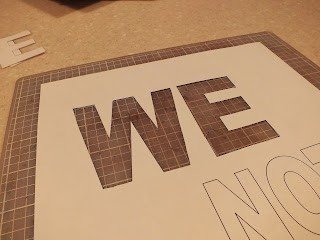
I made this on a 8 1/2 x 11 page, with Word Art - played around with the sizing until I got what I was wanting. 
 
 
Cut the lettering out with the exacto knife


After I cut the letters out, I traced the statement onto my canvas.  I chose to place the saying in the lower right corner... I like the look of things that are a bit off center. 
 
Then decided how I wanted to paint the words on the canvas - I chose the gradient of the rainbow.
 
 
I am thinking of using a very light spatter technique on the canvas in dark blues and light blue to fill in the white on the canvas...
 
It was fun to use watercolors again, I haven't worked with them in quite some time, I had forgotten how easy they are to work with.  Now to find another project I can use the watercolors on. 
 
Have you gotten inspired to try out a new art supply lately?  Have you made anything with it?
 

Tuesday, January 14, 2014

I "heart" Glitter!!!!!!

Glitter is my daughter's favorite color...
Anything with glitter... she loves it.... pink glitter shoes, glitter stickers, glitter dress up outfits, Elmer's glitter glue... you name it... she would love to have it...

It's even better if that glitter is pink...

Now... some of us have heard that glitter is the herpes of the craft world... you cannot get rid of it.. it does not go away... it just is always just hanging out there... loitering... waiting for some odd and random time to POP up...  like on your face... or on your clothes ( perhaps on your booty from sitting on it ) sometimes I have found some in my eyebrows and in the part of my hair... it's worrisome... but treatable.... again... a lot like herpes... 

Now that I have had shared my viewpoint on glitter... let's get back to my daughter's rainbows and unicorns viewpoint of it....  IT'S FREAKING AWESOME!!!!!!!!!!!!!!!!!!!!!!!


For Valentine's Day I put together fun display for our entryway... I made a few new items for this cove that will add some cutesy to the front door when guests come in...

- a new bunting/banner that spells out LOVE - more to come on that later....
- pink ribbon wrapped around candles on the blue candlesticks
 - canvas with pink glitter heart - that's what this diddy is about ...

Supplies:
canvas
blue spray paint or craft paint
painters tape
ribbon
12x12 paper
spray Elmer's adhesive
glitter
craft glue


I taped off preppy stripes with the painters tape ... I used spray paint and then removed the tape... as you can see... it faded into the white... EK!  um... MUST FIX HENIOUS oooozing?...  bleeding?  both of these words just sound disgusting...
 
I cut a heart out of 12x12 scrapbooking paper... to the size I thought would be appropriately sized for the canvas - you can always make it bigger or smaller - whichever your preference may lean towards.
 
I sprayed the pink heart with Elmer's Spray Adhesive, and sprinkled pretty pink GLORIOUS GLITTER all over that bad boy.... and all over my carpet.... all over my clothes...er... I mean onto a scrap piece of paper and placed the excess back into the bottle.


waited for the adhesive to dry, shook off the extra glitter and then smacked that BA heart onto the painted canvas.... nope... back that truck up... remember how I had those smears of paint? 
 
Oh yeah... those...
 
so I raided my stash of ribbon pieces... and found pale pink ribbons that I glued to the canvas to add to the preppy stripes.  Thus covering/hiding my boo boos...


NOW.... I glued the glittered heart to the canvas and trimmed the pale pink ribbon and placed it in the entryway of LOOOOOOOOOOOOOOVE..... 


How about you?  Any crafts for the celebration of love? 


Tuesday, January 7, 2014

Grab a Frosty One... Winter Subway Art that is...

Happy 2014!!!!!


How great is it to have a date where you make a decision to turn over a new leaf, start a new project, refresh, renew and try something new!?!?!?

Well I think that all that excitement calls for some new winter subway art for your houses! 

I have a couple different color options for you to choose from and print off for you homes, grab a frame, smack that bad boy in there.. and viola!  "Instant Art"  - now how you arrange your frame in your home - that's allllllllllllll you ....   :)

Two different color schemes - hopefully one will match or add some color to your home for the winter months! - Or at least for January! 

Click on the print (s) - they are jpg files... easy peasy, pudding and pie... 

I am thinking of putting the first print in the earthy tones in our entry way... I have some color bunting hung up in there currently... check back... I will post a photo of the decorated entry area - complete with this subway graphic! 
 
Happy Winter 2014! 

Thursday, November 28, 2013

Brand New-ish Handrails!!!!


I felt like the announcer on the Price is Right when I wrote the title of this post.  "SUSIE SILLYPANTS SMITH, come on down.... What do we have for her today Drew????  Why... It's a BRAAAAANNNNNND Newish.... Handrail!!!!"  (insert canned applause and a lady jumping up and down in pure joy)

We have two handrails on our main floor that keeps us from falling from level to other level in our house...  they were functional... not really the most attractive, and our daughter can stick her entire body thru the handrails and so can our dog (he's not a manly dog by any means, but he LOVES me!).  SOOOOO someday this could become a safety issue. 

We priced out several different options...it was going to be around $2,000 for the replacement of 2 new handrails... um.... maybe not today... thanks...

I would really like something like this...


I found this photo on the House of Turquoise Blog.  She has a TON of great photos over there, be sure to check her stuff out!  A Def must check!

http://www.houseofturquoise.com/

 I love the mix of traditional and industrial, the straight lines of both the cabling and the ballisters.  I would like to have a runner something like this someday down the road...


However.... I digress into the deep depths of my imagination.... 

Back to reality...

This is what we started with...
view from the front door

view from our kitchen


view from our living room
 
Here are a couple of other websites that were part of my inspiration for our handrails... we debated between staining and painting... we went with paint...

Traditional Staircase - color/stain
Stain/Paint color for stairwell

Steps for the project....
Sanding the varnish off each railing, spindle, and balusters


Clean up dust
Clean up the sanded railings, spindles and balusters
Paint primer onto all railing, spindles and balusterss - 2 coats


Sand to make smooth
Paint Black Latex Epoxy from Sherwin Williams onto the tops of the handrails, and balusters - 2x
Paint White Latex paint on spindles and bottom trim - 2x
Touch up with itty bitty paint brush

Final photos montage...


Seems like it should take like 2 minutes to whip this all together huh???  HA!  This paint project took my hubby and I the majority of 2 weekends and every evening for 2 weeks.... 

But we are super pleased with the end results!  Amazing what a little paint can do in updating! 

Are you planning any painting updates in the near future?

Monday, November 18, 2013

Teal & Orange ARE the new black... 2013 Fall Decor

For those of you who are "Orange is the New Black" lurvers..... a little play on words... still need to get my hands on the full Netflix season to download those badboys....  I so adore Laura Prepon...

oh... so I was going to type and share something with you all.... OOOOOOH yes...  some quick snaps of my fall decor around the house.   

This year's color combo was a fun and festive one, teal, aqua, orange, and chocolate brown.   - Get your color glasses on... its about to get crazy fun in here! 

DISCLAIMER:  nothing in my house is matchy matchy - however I try to incorporate the same things through out the house - either in prints, colors, ribbons, textures etc.   Somehow or another it comes together... - I haven't figured this out yet either...

 Inspiration for the color combo came from this photo/print I found online...
 

I loved these two prints together, the chevron and the polka dot... super fun... super crazy, !  I found these fabrics in the clearance section of our local Wal-Mart - I think I purchased both sets for around $8.00


For those of you just tuning in or checking back... here is a link to my entryway and a free fall printable that I designed...Fall Entryway Decor & Free Fall Printable


So now that we have that out of the way....  lets take a jaunt thru the ole house, shall we?

Starting with our front steps -  I pinned the fabric to our summer, outdoor pillows from Grandinroad.  I just tied some wired ribbon in contrasting blue that I had on hand from The Dollar Tree - $1.00


In our entryway...
I made up a bunting with the lettering of Fall, I painted the burlap in the blue polka dots, and used orange ribbon and orange lettering for the font.  I used my Cricut to cut out the letters.  "Cherry Limeade" was the cartridge font name.


and the lower part of the entryway... complete with some squirrels, owls, and various painted pumpkins that I picked up from The Dollar Tree.   I spray painted the blue pumpkins, two different tones of blue, one a deep teal and the other a calypso blue color by Rustoleum.  I wrapped my 2 blue candles from Summer in the orange ribbon and filled a couple of vases with mini pumpkins.  I also found some fun fall pics and printed them off and framed them up for a layered look. 

 
In our dining room I added a few things ....
 
A burlap table runner - NOTE: I do not typically like to work with burlap - it is VERY messy and dusty... and tends to frey alot... but its fall, and I thought it would be a cute thing to have in the room...
So I cut the length I was going for, and then stamped blue polka dots on the runner using a foam sponge -
 
 
Using the same chevron fabric from the outdoor pillows I actually sewed on ruffles... yes folks... this girl does actually know how to sew.... Please don't let my mother or my husband know though.... I have a reputation to maintain...


 I covered the seams with the same gross grain orange ribbon for a finished look. 

Here is the overall table view...
I really need to get something in that lantern... lots of candles?  Lots of pumpkins, I dunno.. that thing is HONKIN' huge though... so it will take alot of whatevers to fill that bad boy up...

This frame - easy - downloaded some free printables from Pinterest here:
Found the print I liked in orange, traced a leaf pattern out on teal paper and cut it out, taped it to the  orange printed paper, put it in white frame... viola!  Framed Fall Art!
 

In the ole family hutch I printed out the same downloadable background print - only this time in the teal, onto  11x17 paper - and taped it to the back of our hutch - for a wallpaper look - I used 2 pieces per shelf.  Also added in some of those pumpkins.  You can see - glittery orange, teal, and aqua.
 
Just a little last one... in our living room - I have a few items for fall, framed photos of my daughter in a teal and brown dress, along with a coordinating framed photo of pumpkins.
 
   I have these candlesticks and candles which I wrapped the same gross grain ribbon around...  Simple...
 
 
(these small glitter pumpkins were from The Dollar Tree - on the other side is a Jack O Lantern face, that I turned around for Halloween - dual purpose decorating!!!!)


 What did you guys do this year for fall?  Did you have a theme?  A fun color combinations that you would like to share with us?