banner background

mmici21

Thursday, March 21, 2013

Hi, Have you met our front door?

Who's decorating their house for spring?
Who's looking for decor that will go the extra mile.... past the easter eggs and bunnies... maybe even past our town's tulips.... So here is what I came up with and the step by step instructions on the project.


There are so many cute ideas on Pintrest that I have seen that I adore.... but how to incorporate these ideas... without having 87 wreaths, and 8 plastic totes full of different floral choices... all of which I wish we had the storage for... but alas... we do not... what's a girl to do? 

Got myself a few photos/ideas from Pintrest that I really liked.  I have provided the link to the blogs and the photos below...

Chevron Print - really trendy print right now - so I made a template out of cardboard just like on this website:www.pennypincherfashion.com

Pinned ImagePinned Image I loved these colors - yellow and teal -  and the cute simple message of this wreath.... from www.agirlandagluegun.com

So.... I gathered my materials....

Cardboard Template
Poster board - Walmart -- .97
Yellow Paint - Bright Yellow - Walmart - $1.97
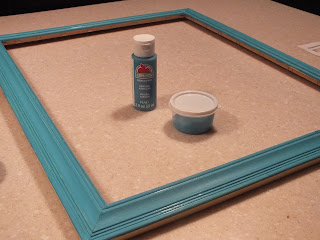
Teal Paint - Bimini Blue - Walmart - .57
Yellow Polka Dot Ribbon - Dollar Tree - $1.00
Picture Frame - Mahaska Co. Outreach - $2.00


See my picture/print out of my collaboration of ideas.. Always nice to see your inspiriation in front of you.....

Next Step, I took the picture frame apart - the mat and picture was all moldy and gross, so no love lost in getting rid of that.  All I have left is the frame....
I painted the frame the teal....


 Then I traced the chevron template onto the poster board, and painted the stripes in with the Bright Yellow paint.


I cut the painted poster board to fit the frame...
Cut out the wording "Hi" on my Cricut - I layered it up with grey houndstooth and black paper...
Glued the wording to the board, and inserted into the frame.
 
Added the yellow polka dotted ribbon - stapled to the backside of the frame. 
 
Tied a ribbon and hung on the door! - Hi! Have you met our front door?
 
Welcome to our home!
 

Thursday, March 7, 2013

Entrance.... Stage Left... Watch out for changing props...

When you walk into a home, you want to have an area to come into ... a foyer... a loitering area... one that houses someplace to hang up your coats, somewhere to put your shoes, and gives you a glimpse into the home that you are entering. 

Well I don't have some grand foyer with a crystal massive chandelier, nor do I really have much of a loitering.... in fact when we bought the house, there really wasnt much of an entrance at all.... nothing very welcoming about it... the flow was WEIRD and choppy.... and did I mention WEIRD?  I struggled with this for quite some time, how do I make this area work for us?
So.... we created an entry area! 
I have seen all kinds of great ideas on Pintrest, and there are some really talented people who make benches, cubbies, and multiple areas that really jazz up their entry areas while also making it practical. 
But how did we make it our own entry way?  One that incorporated my style (electic and oddities) and my husbands style (long lasting and affordable) that was also practical?  
Well I had this door from my parents old garage on the farm...  this door used to be on a rolling rack, held from the top (like the old farm doors you see coming back into style now).
This door was just basically a door that was in our living room in our previous house in the corner as a decoration.  - I began to see that it actually had another purpose...
I wanted this door to create a partition in the small walk way to the dining room, so it would create a nook of sorts.  


So here is the poor wooden door that weighs a tremendous amount...  laid down for sanding... layers of wonderous lead paint.. 

The door wasnt the entire size of the opening, so Shawn had a great idea to install this door to make it look like it was floating in air -  either suspended in air while still allowing the concept to be open and airy...
Here he is installing the screws into our flooring and joices for support.  He covered the HUGE screws with a pipe that was spray painted black....

Here is a view from our dining room looking at the front door...


Door has now been sanded, and suspended by screws... 
Here is a couple more views of the door before it was painted.  
Views from the dining room/kitchen


View from our front door


We painted the door a milky white color called "White Chocolate Mousse" I didnt want it to completely match our white trim.
We spray painted the door handle to match the piping that covers the screws. 


 Look at Shawn, he's so cute, getting in there and making sure that everything is JUST RIGHT!  He always does such a great job at these projects I come up with. 


So for the past year or so this has been our entry area.... and it has been great....

Lamp Base - Target $20.00
Lamp Shade - Walmart - $13.00
Woven Basket - Target - Price - dont remember I have had for awhile now...
Various photos of us... from all over


Stay tuned... just because this looks ok... doesnt mean I will keep it that way!  LOL