banner background

mmici21

Thursday, February 28, 2013

The Dining Room - not just a formality

According to Wikipedia the dining room is a room for consuming food.  In modern times it is adjacent to the kitchen for convenience in serving.  In the medival times, it was on a different level than the kitchen completely...  oh and they had a wait staff.... other than the momma/wife.

Most tables tend to have a rectangular shape and a number of chairs, some formal settings have 2 chairs for the head and end of the table with two arms and then armless chairs for the sides of the table for those joining the head of the family and his wife or mother. 

I always have enjoyed the look of formal dining rooms, and the idea of having enough seating for my family to all sit around and share a family meal.  I feel that a dining room conveys the thought, the idea of making memories and family traditions. 

Here is the dining room of our house at the beginning when we moved in (minus the fridge - http://smothersx3.blogspot.com/2013/01/escapades-of-remodeling-part-1.html ) , it was originally called the piano room, it was completely blocked off from the rest of the house, did not have overhead lighting, only electricity was the 4 plug ins.  The wall between the dining room and the kitchen was knocked out and opened up.


Here is a view of the dining room/piano room from our front entry way... this was a small pass thru "hallway" that was quite narrow... and I didnt feel like it had a purpose... therefore = another project in the wings ( a story for another time)


My husband installed a floating door from my parents farm.. this door hung on the garage and hung from an industrial railing and slid open in the middle... all together there were 4 doors, and they are VERY heavy. 

Here is a view of the door inside the dining room, paint sanded off, ready to be painted.


Door is painted and installed.


We wanted to spruce up the dining room to go along with our newly spruced up kitchen... but didnt want to spend alot of $$$$$$$$$....  so...  here is the money and the steps in our "remodel" for this room...

Painted the room a beautiful french blue color, installed white beadboard and railing.  We ripped out the carpet in the room and installed bamboo flooring.   Total spent on this room $800.00.

We purchased our overhead light at Lowe's on clearance for $200.00 - it's a Pottery Barn knock off. I love the look of all the "candles" and the fact that we have lighting in there!

The art work in the room consists of black and white photos from Seattle, WA.  My brother used to live out there and loved it.  I would highly recommend it as a vacation experience, I loved it.  That city has a great energy about it, one with the beautiful views of the mountains and hiking, and access to the ocean. The photos in this collage I feel capture the essence of Seattle.  The big photo in the middle is from a carnival ride and states "MUSIC", there is a small photo of the Public Market sign, and then another couple signs from the inside of the market "Fresh Fish" and an antique arrow.  There are two other photos that I feel are beautiful for your mind...someone had wrote in wet cement "Dont Lose Your Soul" and then in the public restrooms in the basement some graffiti artist sprayed "Question Everything" - beautiful statements.  The overall photos just came all together to represent the artistic vibe and the creative spirit that Seattle really encourages.  The best thing about it, I love the oxymoron of having a "formal dining room" with the informality and artisitic-ness in these rebelous statements and photos. 


On the wall on the right, a statement from Marilyn Monroe "Imperfection is beauty.  Madness is Genius.  And it's better to be absolutely ridiculous than absolutely boring. 

There is a bay window in our dining room, one that I am not too fond of, but I am told by Shawn that it's staying.. so I hide it with pillows of different textures - in browns, golds, and blues. 

Curtains are flat sheets from Walmart that I bought on clearance for $7.00 a set.  I bought two sets...  They came contrasting pillow cases, so I made a small bench pad out of the two pillow cases... this isnt ideal... I think it needs more padding for the look to be better... but this will do for the time being.


Our table decor - two citron yellow urns from my girlfriends shop in Oskaloosa  - The Painted Daisy.  If your in town sometime, stop in and check her out, shes on the square and has really great quality products! 

The table runner is from Mahaska Drug as are the two small owl votive candle holders. 


The hutch in the corner came from a local thrift shop for $25.00, it had a broken glass pane in one of the upper doors, I had it replaced by Oskaloosa Glass for $3.00.  I painted the inside of the hutch a pale contrasting/complimentary blue.  Our dishes and glass ware really shines and shows nicely with the coloring behind it.  I love the old antique Westinghouse fan.  


The sign above the bay window is an old wooden sign that my brother and I found in a pile of boards on my parents farm.  I salvaged it away for many years (Yes, I was a collector of oddities even when I was young).  We washed it up and attached it to the wall. 


Here is a viewing of our flooring - dark bamboo.  Rug is from Target, we had this rug in our first home.  Our dining room is a step down from the kitchen, you can see the contrast between our cork flooring in the kitchen and our dark flooring in the dining room.  While I love the dark flooring, it does show the dust alot easier.... something to think about if you are getting ready to remodel. 

The plant in the corner is from my daddy's funeral.  His aunt June gave that plant to me... and I have worked very hard at keeping that plant alive.  I found the planter at Gordmans for $20.00 and filled the bottom up with spray foam and rocks for drainage and easier mobility if needed.  It gets great sunlight from the afternoon sun. 


As for my vision for a room to hold our family dinner's in, I think I have incorporated many aspects of our family in this room...  the dining set was purchased with the $ that was given to Shawn and I at our wedding, it has enough seating for our guests, my mother's favorite color - blue, the photo collage from Seattle where my brother was stationed for many years, the fact that most families are ridiculous and beautiful, the plant from my fathers funeral, eclectic items from my family farm where I spent many years at, a beautiful antique grandfathers clock which was given to us by Shawn's grandparents (his grandpa restores old clocks), dishes from my memaw... I really feel that our family is represented in this room - not in person but items that capture them.  And isnt that what a dining room really is... a room for your family to gather in and enjoy time together, sharing food and stories?

Not the formality, its about the gathering together around the table....

Thursday, February 14, 2013

Sweet Nothins'.... oh Sweet Nothins'...

Happy Valentines Day to you all!  Or as our daughter say "Happy Ballentine's Day!!!! 
My husband and I are working on staying on a budget so how do we celebrate and stay on budget?  I thought I would share some cute little sediments that I gave to Shawn this past week.  I gave him one gift a day this week....
 
For Monday - a honeycrisp apple - Your the Apple of my Eye!
 
For Tuesday - a fake toy sucker from The Dollar Tree - I'm a sucker for you!

 
For Wednesday - Air Heads from Casey's - You make me air headed!

 
Thursday - Crush soda from Smokey Row Coffee shop - I have a CRUSH on you!

 
For Valentine's gift exchange from Finley and I....Reeses Pieces - Daddy, we love you to pieces!

 
 I had alot of fun finding little items along the way that I could twist and tweak for Valentines gifts.  I hope that he liked the silly sweet nothins that I left for him every day.  I cannot express into words, there isnt enough hugs and kisses to let him know how much I appreciate him and all he does for our family.  He is a great daddy, a great husband, partner and best friend. 
 
Happy Valentine's to each and everyone of you lovebugs out there.  I hope that someone tells you today how special you are. 
xoxo!

Sunday, February 10, 2013

Valentine, I'm WILD about you!


Valentine, I'm WILD about you!
As a mom of a toddler, I would rather not have my daughter eatting candy at every holiday.  So for her Valentine's gifts for her little buddies at daycare I wanted something that didnt include sugar, sugar, sugar and more sugar.  Thanks to the idea of a friend of mine, Ann Drummond, we came up with a very affordable and cute gift for her friends!  


 Finley and I went to our local Dollar Tree and picked out 6 animals for $1.00 a piece.  Finley got to say what animals she wanted for her buddies, and she LOVED it!  She went thru the store proclaiming her excitement  about these upcoming gifts... it was very sweet to see her wanting to share toys with others and to see her happiness in giving a gift to a friend.


Our materials needed list:
Construction paper - 1 pc of Pink paper
12x12 Zebra paper - 2 pc at 1.00 a pc.
Markers 
Scissors and Pinking Shears
Paper Cutter
Animals - $1.00 a pc.
Double Sided Tape
Stapler
 Cutie Patootie.... excited to make Valentine's for her friends at daycare!


 Packaging of our Valentines.....

 A little cute sediment ....


Finished product!  A fun little animal toy to play with, as well as a cute little expression to share a little love with her friends!


Sunday, February 3, 2013

Mixed Media Collage Wall


Do you have that space in your house that just is a dud?  What do you do with it? 
Do you have multiple items that you love, and want to display, but don't know how?

I had all these great ideas and pictures pinned on Pintrest just burning in my mind...I struggled though.... how do I incorporate all those ideas and craft projects into one collaboration?

My solution.....  A mixed Media Collage Wall in my upstairs hallway! 

Color Combonation.... Wall color - Woodsmoke (Better Homes and Gardens color)
Teal Blue, White, and Orange accents. 

So I began to collect all my random items, my picture frames, free printable sayings from blogs I had found and downloaded.  Here is a photo of my collection...  in progress.....


Next Step was to make my craft items that had caught my attention on Pintrest... 
 
Modge Podge Phots to Canvas
Paint and Modge Podge Photos to Woode Plaques
Incorporate scrabble pieces into sayings
Add texture to the wall by using fabric in fun trendy prints


                                     these wooden plaques were .97 a piece.  I purchased 3. 


I painted 2 of the frames teal blue and one orange.  I also painted a letter S teal blue as well. 
 

I then used Mod Podge for the first time, I found two photos of my daughter that I loved, and I applied them to the wooden plaques with Mod Podge.  I followed the directions on the back of the bottle, this product is great to work with. 
 
 
Next I created my own "subway art" canvas project..
 
 
First - I painted the canvas blue all over with spray paint.
Second - I selected my paper colors, orange, grey, teal blue and white.
Third - I cut out my saying on my Cricut.  I used 2 different fonts.  Cherry Limeade and George and Basic Shapes.
Fourth - I glued my wording to the canvas after deciding on the layout I wanted.
Fifth - I coated the canvas with Mod Podge to seal the work.
 
 
While that canvas was drying.... I moved onto my next project...
Scrabble Art!
 
I found these great Scrabble tiles at a local thrift store for .50 a game!  I bought 3 games... I figure I can do alot with these letter tiles down the road.


I attached this blue plaque to a white canvas. 


Now my collection of goodies and treats are ready to be hung up and displayed....
A big thank you to my husban for helping me hang up all these wonderful items!  xoxo!
 
Fabric covered canvas's - the fabric came from Hobby Lobby - $4.99 a yard.

I had the big letter S from an adventure to MN with a girlfriend.  It came from a Steve and Barry's that closed down.  It was a dark navy blue originally.... I spray painted it a creamy white.
 
 
I am still looking for 2 other items to fill in the area above the two 8x10 white frames. The great thing about a collage wall is that, it all comes together... over time... its something that is ecelectic but somehow all matches when it is put together.
 
I hope you enjoyed looking at our fun mixed media collage wall.... I hope that you found some inspiration from this project. 


Wednesday, January 30, 2013

Snow Day Crafts... Felt Hair Clips

Today is a SNOW DAY at the Smother's house.... so what shall we do to entertain a 2 year old and a dog who constantly wants to be out in the snow... until he realizes he's cold and wants to come in.... every 3-5 minutes .....

I feel a craft coming on! 

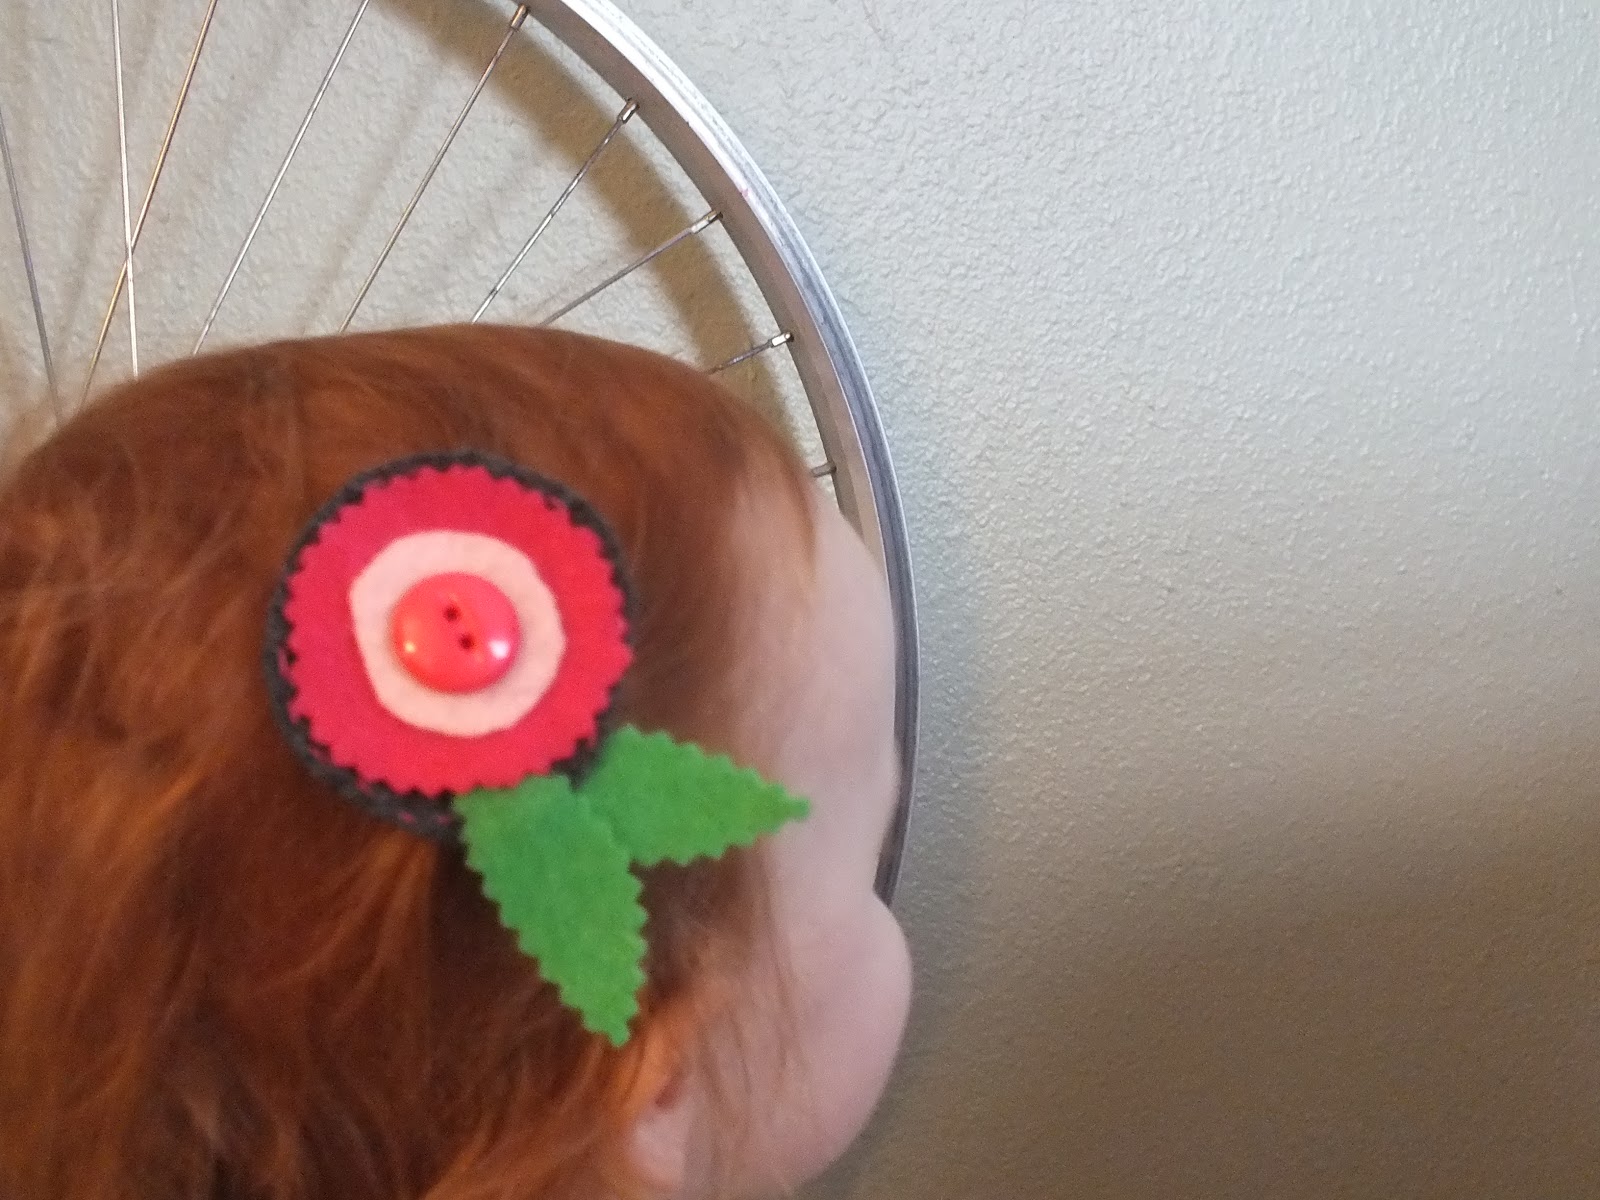
Finley has some outfits that she doesnt have hair bows for... so I thought I would share with you all how I fixed that "issue".  Here is a look at the final products, I also did a flower in lime green, grey and white, which isnt pictured here.  These 3 clips took less than an hour to make... I had all the materials on hand, except for the hairclips (major part of this project, so they are a MUST have)

My mom and my grandmother would be so pleased to know that I even did hand-stiching on these babies.... and this girl... isnt one who sews....

Materials List:
Felt - I used 3 colors - these are usually sold anywhere from .20 to .50 a pc.
Button in coordinating color
Thread & Needle
Glue
Ribbon
Scissors - i used regular and pinking shears
Ribbon - $1.97 for small grossgrain ribbon
Hair Clips - $1.98 at Walmart


Next is the prep time....

First -
I glued the grossgrain ribbon to the hair clip... measuring roughly 1/2 inch longer than needed, you will fold this extra in and glue it down.  I used white for this clip... and its a little difficult to see... however the ribbon covers both sides of the clip, and then folds into the inside. 


Second -
I cut out 3 circles from my felt pieces, in 3 varying sizes.  I used the pinking shears on one layer to give some texture to the flower layers.  I ran a small dab of tacky glue in between each layer.

Third -

I sewed a yellow button onto the top layer (white felt) to hold all 3 pieces together.  while in the sewing phase of the project I also "outlined" the dark blue felt with the yellow thread as well, giving it a little home-spun cutie pie look. 


Look Mom!  I actually sewed something !!!!!!! 4-H really did pay off in the long run!
 
 
Fourth -
 
I cut out two green leaves from felt and glued them on the backside of the yellow bottom layer.  I then glued the ribboned hair clip to the felt flower....  
 
 
Here is Finley modeling the pink and grey flower... please excuse her bed head... she wasnt quite ready to get dressed and ready for the day yet.... 


What fun craft projects can you and your family come up with this snow day?  Whatever it is that you choose to do today, please stay warm and safe.  Cherish your time with your babies, they are such an awesome blessing! 
 
Have a wonderful day!


Sunday, January 20, 2013

Escapades in Remodeling - Part 4

 
Today is the big reveal!!!! 
 
Here is the kitchen before....once we had the fridge and stock cabinets installed.
 
 
Here is the final product!!!!!  I absolutely LOVE LOVE LOVE my kitchen!!!! 


 Our lights were ordered online from Ferguson, two pendants over the island and then one big drum over our kitchen table.  Costs were originally $600.00 with shipping.  However...  the light over the table had some wiring issues, and the company credited us the cost and we were able to fix the issue.  This company has great customer service, very helpful and quick to take care of any questions or issues that come about.    So the total cost came to $
 
Exact Budget Breakdown:
         Cabinets - $12,700
                           Island countertop redo - $100
           Flooring - $ 650.00
              Microwave - $300.00
              Backsplash - $435.39
         Lighting - $200.00
          Hardware - $200.00
                     Industrial faucet - $200.00
Paint - 50.00
                                       Electrial items - bought in bulk before
  Tools - $800.00
Trim - $80.00
 
 
Grand Total: $15,015.39


Lets take a snoop thru our cabinets and our upgrades that were provided by Kraftsmaid - FREE!
 
Corner Lazy Susan - houses our pots and pans 

 
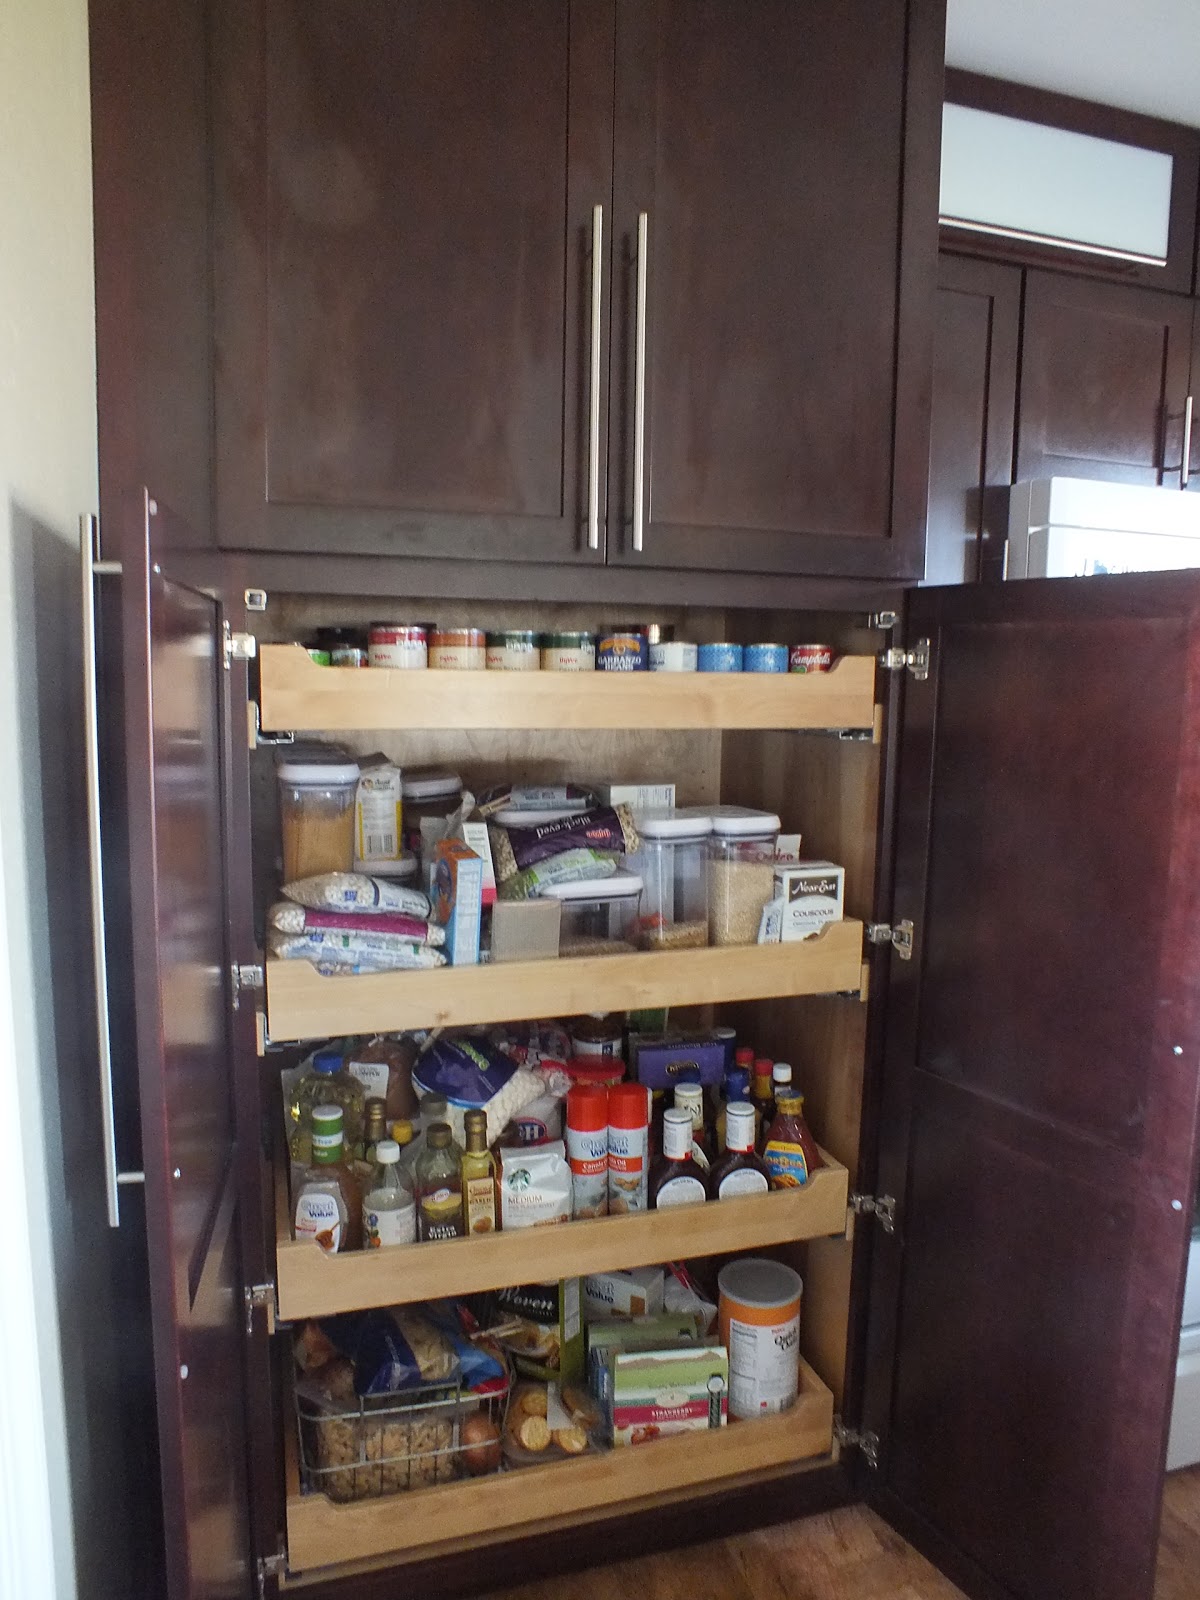
Our pantry (please excuse our mess!) All pull outs have soft close.  The cabinet above has 3 shelves and houses our mixer, blender, food processor, and our wine and liqour (got to keep it out of reach of small people)

Picture of our free sink base and tip out drawers - provided by Kraftmaid - for FREE!
Faucet came from Lowes

 
Pull out cabinet with 4 shelves.  Houses our odds and ends at this time.  Kitchen towels, baggies, lunch box, and the neccessities

 
Here is a nice view of the kitchen and the new location of the fridge. 

 
A shot of our upper cabinets.  They hinge upwards - this is only available thru Kraftsmaid.  The hinging is quite impressive... they are also soft close.  GREAT Storage!  These house our serving ware and pitchers. 


Pull out drawers in the island - vew of our silverware drawer....

an ever so lovely view of our pull out recycling center... complete with cans and our recycling materials.... aka trash :)  


A view of our other pull out drawer in island.

 
This light is a fun little story!  This used to be a plant hanger that I bought at an antique store in Oskaloosa.   This used to be a mobile in our house in Oskaloosa, and was serving no purpose at the new house in Pella.  So, I asked and Shawn made this into a light!  A pendant light fixure from Lowes for $12.00, a cross bar welded to the metal ring and a lightbulb from Walmart.... There was some welding involved and some help from our neighbor Blake, viloa... light fixture!
 
 Originally, he cut off the metal basket, and then created an original light for over our sink. 
He drilled small holes in the metal ring and the silverware.  The silverware came from the Pella Thrift Store.  Each piece was .25 if memory serves me right....

Our under-mount sink and faucet.  The sink was new when we bought the house, so we kept it as well as the countertop.  - Money saver!

Our broom closet!  Houses our extra cleaing products, shark steam mop, and other various items.  Everything has it's place! 


close up of our hardware and backsplash.  The tile color/style is called Flagstaff as was a dry stack so it was a pretty quick and easy install with thinset on the back and some pressure.  We did seal the stone, which will last for 10 years. 

Our upper lazy susan cabinet that houses our baking goods and measuring items.  My Grandma Alice had lazy susan's in her house and I always liked them... so I wanted that in our corner cabinets as well.
 
Here is the overall picture again... final product, and I absolutely LOVE my kitchen, all our items in one organized room, its efficient, the flow of the room is so handy, and makes our time in the kitchen so much better.  The way it updated our house and brought it out of the 1970's is amazing. 


Many thank you to each person who helped us with our dream, without you, we wouldnt have this wonderous room for our family for many, many years to come.  The saying is true... the Kitchen truly is the heart of the home!

Next remodeling "treat" for Shawn..... the dinning room