banner background

mmici21

Friday, January 18, 2013

Escapades of Remodeling - Part 2

DID SOMEONE SAY DEMOLITION?  SWEETNESS!!!!  I have some agressions that could be worked out via a sledge hammer and a pry bar...  plus an extreme hatred for cheap cabinets with a waxy plastic varnish on them... along with a strong desire to have my gorgeous cabinets installed :)

Welcome to our mass destruction... WARNING... the photos you are about to view are quite graphic and full of dirt, dust and insulation....  again... quite graphic... like remodel/construction porno.. only more PG... 

All upper cabinets are out.... we saved them for our friend Cory Brown's garage.  Since he helped us with the remodel, we donated all our cabinets to the Brown garage storage over-haul. 


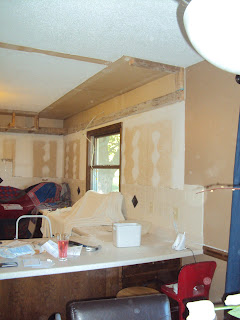
Soffit?  Who needs soffit?  Space waster!  Dry wall that is available for punching holes?  Dont mind if I do! 


We decided to save the countertops that came with house, for two reasons....
1.) they were brand new, Corian and were very neutral
2.) Corian countertops are great for germ free and low maintance
3.) Repurposing allowed us to save $$$$ on our budget...  the breakfast bar is about to become our island! 

 
protecting our undermount sink from the MASS DESTRUCTION..

 
I am so going to need to get our furnance and our ducts cleaned out after all this dry wall mess....


Its all opened now and all upper demoltion has been completed...
So far we removed the following:
Upper Cabinets
Canned Lighting and wiring
Soffit and all framing
Drywall


Now onto the base cabinets and the removal of our tile backsplash.  I did like the metal tiles that the previous owners had used, however I couldnt figure out how to use them in the new design. 

 
Hey, there's Cory Brown!  I cannot even begin to describe how much he helped us.  Many thanks to him for his many talents, his patience and his time.  He gave up so many weekends and evenings to help us with our dream, hes an ACE in our books!  Thank you to his family for sharing him with us.  XOXO!

 
Shawn and Cory cut the countertop on the breakfast bar in hopes that we can use it on the island - just a straight cut, I think they went thru a couple saw blades LOL. 
 
We have now removed:
Breakfast Bar
Backsplash


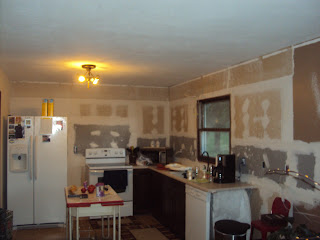
Now to cut out the damaged drywall from removing the backsplash...

Hello exposed insulation.... we shall become friends over the next few years...


We used Backerboard instead of drywall.  We used this since we would be installing a new stone backsplash.

Well... we kind of have a kitchen... running water... coffee pot, fridge, microwave and stove....I have yet to have a construction breakdown yet...

Cost for this process:
roughly $200.00 for mud, tape, backer board and hiring out of the texturizing of the celing.

Running Budget Total: $13,200
Amount Remaining:$6,800

Over time (2weeks), we removed ordered our cabinets, demo'd the cabinets, backsplash, removed the entire countertop to use later on, removed the flooring,  and started with NOTHING in this room....

We hired a co-worker to texture the celing so that the two seperate rooms become one, he did the knock-down.  Thank you Vant!

Installation next.... 

Thursday, January 17, 2013

Escapades of Remodeling - Part 1

The Smothers Kitchen Remodel.... duh duh duh..... 

Just the thought of overhauling a major room in your house sends cold chills down any homeowners spine....  The kitchen is the hub of the home... everyone in your family uses this room... FREQUENTLY.... it takes the most wear and tear of any room of the house. 

When we moved to Pella two years ago, we were in a small pinch... we had sold our house in Oskaloosa way quicker than anticipated, and needed to find a home to meet our needs.  We found our home and loved the neighborhood immediately, HOWEVER.... while this home is continously growing on me... I did not like it at first.  (I think I was still in love with our previous home in Oskaloosa).  This house in Pella is a multi-level home, and the kitchen and the flooring drove me bananas!  A kitchen remodel was a MUST HAVE in my opinion.  I had to keep bits and pieces of our dishes in different rooms...  and our refrigerator didnt even fit in the opening so it was in our dining room for several months! 

The kitchen and the eating area was seperated by a small choppy wall that didnt contribute much to the open concept that I was looking for....  


So the remodeling began.... The wall came down, three stock cabinets from Lowe's in Altoona went in, and the refridgerator was moved into its rightful place - in the kitchen! 


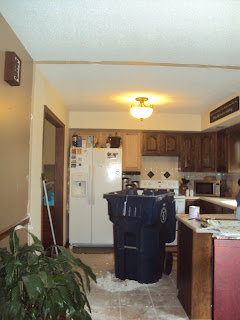
So much wasted space with the soffit at the celing, thats got to go folks!  Opportunity for more cabinets!


The refridgerator was in the room the the left in this picture...


Partial Wall down!  Nice Open flow from the eating area into the kitchen!


We went onto to stain the stock cabinets so they fit into the kitchen.... just the cabinet fronts looked different.


Since we had gotten the basics figured out in the kitchen to make it work more efficiently, now the challenge started.  How to plan a layout that incorporated our wants and our needs, as well as fit into our set budget..... 

Wants and Needs List:
  • an island
  • proper lighting
  • pantry space
  • new flooring
  • backsplash
  • broom closet
  • maximize all space
Budget:
 $20,000 - "gulp"

We had several appointments with different cabinet companies, looked thru numerous magazines and articles online to help come up with our list and our vision.  Lots of stressful planning conversations that neither my husband nor I enjoyed.  The planning went on for almost a complete year before we pulled the trigger on the remodel.  My husband designed the layout himself on the autocad program he downloaded from the internet.  It helped us visualize the layout much better and scaled all items. 

We bought our cabinets from Lowes in Altoona.  We worked with a delightful gentelman named Jim who helped us emensly.  I cannot thank him enough for being patient and understanding with us.  We went cabinet shopping with an infant, and he played with our daughter and never rolled one eye when I had to interrupt our planning sessions to feed or soothe her.  Everytime we have seen him in Lowe's he always smiles and greets us by name, even our daughter.  Now that's customer service! 

We pulled the purchasing trigger on our cabinets during a sale, for every $15,000 you spent on cabinets, you would save $3,000.  Plus Kraftsmaid also provided a free sink base (savings of $800.00) and free soft close on all pullouts and drawers (savings of $1,500).    We spent $12,000 on cabinets, got all of our needs met, stain color, door style, cabinet type and buget needs. 

Cabinet Brand: Kraftsmaid
Stain Color: Kraffee
Door Style: Devron
Wood Type: Cherry
Glass Inserts: Frosted

Now the demolition....


Thursday, January 3, 2013

Big Preppy Jackie O necklace

Welcome 2013! 

While I have not been very good about posting our family's outings or projects in 2012, I am hoping to change this in 2013.  - New Year's Resolution time and all...  So... here is my BIG PREPPY JACKIE O NECKLACE  :)  - minus my daughter's I love you to the moon and back chain that I wear all the time. 


My first crafty project for 2013 is a rather over the top twist to the classic pearl necklace... My personality is rather over the top, so my accessories need to keep up too LOL!  This necklace was inspired by a couple of pins from Pintrest that I came across and I thought "I can do this too!"

 All the layered necklaces seem to be pricey for me and I wanted to have the look, without the price... sooooo... Thrift Store digging it is!  I went to Mahaska County Outreach (great thrift store in Oskaloosa Iowa) and purchased 3 necklaces from them for $4.00. 


Putting all three together, so that the clasps were on the sides and that the layers of the pearls were stacked and layed nicely... I then cut a 12 inch satin ribbon in pearlized taupe (you can change out the color of the ribbon for any outfit!) and made my first knot on the side where the clasps were hidden...


Now onto the other side... duplicating the double knot... on the other side - making sure that the strands of pearls were still laying nicely I tied the other side of the ribbon to complete a necklace... I had to try it on a couple of times to ensure that the length was good on me, I just shortened the length each time I tied it and cut off the excess ribbon. 


Monday, March 26, 2012

Kitchen Art

After wrapping up our Kitchen Remodel project this winter, we had an open wall that needed something.... but what???

I have what I consider perhaps an Urban taste sprinkled with a little classic for a little concoction I call Classic Urban Decor.  I like to have items serve other purposes then perhaps what they were originally intended for.  For example... We currently have an avacado green ironing board as our coffee table in our living room... or small canoe paddles for our handrails going upstairs...  So when this wall opened up for some urban decoration.... what was a girl to do???? 

Bike Wheels... Bike Rims...  WHAT?????  HUH???? 

LOL, at Christmas we hung the Christmas Cards we recieved onto the spokes with clothes pins so everyone's card was on display.  My husband was great about attaching the wheels thru the middle of the hub with some MAJORLY long screws and then closing the hub up with the original hardware so that the wheel appears to be just suspended on the wall.   VERY NEAT EFFECT!

I found these wheels at the bike shop in Oskaloosa, IA.  I was charged $1.00 a piece for these beauties!  Can you believe how great they look!  This fills a wall with urban statement pieces... for a massive total of $3.00...  holy cats batman! 

April Showers bring May Flowers!

I found the cutest arrangement idea on the Better Homes and Gardens website (http://www.betterhomesandgardens.com/) for our front door.  I loved the fresh pinks and greens of their arrangements, and decided to put my own spin on it :) 

Supplies for the project:
Green Umbrella - Target $12.99
Silk Flowers - on hand
Letter "S" from Hobby Lobby - $1.99
Blue Paint for letter - on hand
yellow Ric Rac - on hand
Blue Ribbon - Walmart - $1.97


I opened up the umbrella, hung it on our command hook

Inserted the tallest flowers - french tulips and the yellow gladies for the height


added the painted letter "S" to the umbrella, I thought this could be for either Smothers or for Spring, whichever.  I tied this to the umbrella wire with the yellow ric rack I had on hand.
I also added some crumpled paper into the umbrella for a base for the next step.
I wrapped the pale blue ribbon and the ric rack around the umbrella and tied into a knot
I filled the remaining part of the umbrella in with the small flowers and grasses that I had on hand.  These are sitting on top of the crumpled paper base located inside the umbrella. 

Finished Product! 

Wednesday, December 21, 2011

Sharp/Smothers Wedding Part 3

LET'S PARTY!!!!!!! 

Onto happy hour and the reception!!!!

Shawn and I wanted to ensure that our guests really enjoyed themselves at our reception, we also wanted the reception to be reminiscent of Christmas at Grandma's house.  Who doesn't love going to Grandma's house for Christmas?  Her house smells so yummy and delicious, your cousins, aunts and uncles are all there teasing each other.  I can still hear my dad and my uncle Don and my cousin Gary ribbing each other about whatever the hot topic was that day, meanwhile my uncle Richard just sat back and chuckled at their silliness.  I always loved getting out my Grandma's good dishes to set the table with, she had the cutest spoons, they were Shirley Temple spoons, I looked forward to getting the good china out of the hutch and the silverware out of the buffett and setting the table. 
I digress....

Happy Hour ran rampant during the wedding party's icy limo ride around Centerville Iowa. 

Our guests were able to sip on speciality coffee's and hot chocolate from a local barista while being entertained by the Centerville Swing Choir, who enthusiastically sang Christmas Carols for over an hour for our guests. 


We wanted to keep the happy hour theme and so we served Mashed Potato Martini's and Shrimp Shooter Cocktails!
The Mashed Potatoes were garlic mashed and the guests were able to put whatever toppings they would prefer, onions, bacon, cheese, sour cream - make it the works folks, everyone loves loaded mashed potatoes!  These were served in a martini glass.
Shrimp shooters were served in shot glasses full of cocktail sauce and shrimp. 


For our meal we served the works, something you would get at Grandma's house.  We wanted our guests to be nice and full!!!!

Menu consisted of:
Salad - Caesar or mixed greens
Main Entree - Chicken breast on rice pilaf bed or a roasted pork loin
Side Choices - Green beans with almonds and ham, and buttered corn
Starch: either a baked potatoe with the fixings and party potatoes

Our menus were printed on 11x17 white paper and folded in front of each guests place setting. 

Each guests place setting included the following:
Party Favor/Christmas Gift wrapped in a clear box - Applesauce and Cinnamon ornament for their tree
A Christmas Tree
A fleece mitten which was sewn by my mother in law, to hold the silverware.  I glued on the mongolian sheeps wool cuff (this was the same wool used on our invitations).  A sprig of Evergreenery was placed under the mitten just for fun!


Before each table was served they had to "compete" to be served food first....
our reception emcee (my uncle Don Davis) refrereed this chaos.... guests had books on the tables of things that they could do as a table.
Examples: Stand up, and sing Jingle Bells, give the bride and groom a smooch on the cheek, do the Chinese Fire Drill around your table etc.  It was CRAZY fun and everyone laughed and were entertained while waiting for their food.

Our wedding cake was actually made by a local gal in Centerville, Laura Brown.  It is actually fake!  Shawn and I are neither ones huge fans of cake so we went with a fake cake (saved us money in the long run!) 

The cake table showcased our mothers wedding dresses as well as our parents wedding photos.  My mom's dress is on the left and Shawn's mothers dress is on the right. 

Our cake was frosted in creamy white frosting and sprinkled heavly with coconut to resemble snow.  Laura also sprayed opalescent glitter all over the cake since it wasnt being eaten by guests.  The cake was topped off with HUGE "diamonds" to bring in the bling bling!


After the meal our guests were treated to frozen grapes to cleanse their pallates, Moscato di'Asti or Sparkling Grape Juice, and then the dessert!  Triple Marscaponne Cheese Cake from Sweet Binneys in West Des Moines.  Folks this cake is from heaven... the Lord himself may make this cake in his free time.  There is a dark fudge crust, layers of dark chocolate, milk chocolate and white chocolate....  *sigh* HEAVENLY!!!!  Also on the plate was a delicious sugar cookie from Mrs. Beerends from Sully, IA. She makes the BEST sugar cookies ever!!!  Her husband made the cookie cutter just for our wedding!  These cookies were glazed in chocolate and vanilla frosting.


Our reception decorations consisted of 5 different table scapes.  Remember I dont like things to be matchy matchy LOL!

1.) Silver trees adorned with mirrored garland - quick drying cement mix inside a terra cotta pot, a tree branch - let it dry, spray paint the "tree" and tie mirrored garland to the branches.  The garland was made by glueing 2 pieces of mirrors to fishing line.


2.) Low centerpieces of evergreenry, ostrich feathers and gold ball ornaments, spider mums, curly willow and the herbs of sage, rosemary and lemongrass.


3.) Clear vases filled with frozen peas and cream roses and hydrangeas placed inside the vase.  As the peas melt, they water the flowers! 


4.) Full length mirrors bought at Walmart, painted frames with oversized pinecones, and various heights of candles, some even held in candelabras found at thrift stores.


5.) 3 different sized clear vases with Cream colored hydrangeas, roses and carnations.

To mix up the seating and to maximize the space we did have to use different table types.  We used both circular and rectangular. 

We used wrapping paper as table runners on each table.  At the end of the night you just grab it, bunch it up, and throw it away!  We had 5 different prints of paper, all in the green family.  This also saves on renting more linens....

We rented our linens from a company in New Sharon - I would highly recommend them.  We used both cream colored and olive green tie back sashes to again, keep things different. 


Our head table was kept simple with our last name as the showcase feature.  The letters were bought online from Oriental Trading and spray painted gold.  Fresh evergreen garland and green glittered ornaments were on display as well.


I actually brought our personal china from home for the head table, along with the gold chargers.  I made the champagne flutes - well I bought the plastic champange flutes, and then glued on swaroski crystals all over the flute for the bling. 

The tie backs on the head table were spiced up a bit with evergreenry and pinecones to bring in the earthly feel.


Each person in the wedding party were given 5 free drink tickets along with a diamond ring paper weight that we actually re-purposed into napking rings LOL!  The diamond rings were purchased online.


Shawn and I danced to "This Years Love" by David Gray, absolutely the sweetest song...

My brother and I danced to "Stand by Me" by Ben E. King. One of the greatest songs to represent our relationship.... no matter how crappy kid.... just stand by me... we shall make it thru...


Shawn and his mother dance to "Simple Man" by Shinedown.  Shawn liked this version better than the Lynard Skynard version.  I think its a great song!!!!


To Be Continued....