banner background

mmici21

Tuesday, December 20, 2011

Sharp/Smothers Wedding Part 2

Onto the sanctuary and the wedding party today!

Photos by: Stone Photography, Oskaloosa IA
Flowers by: Shelly Sarver, Pella IA
Hair by: Sonja Morris
Make-up by: Susie Rouse

As guests entered the sanctuary they were greeted by ushers dressed in black on black pin stripped suits, with fantastic boutonnieres designed by Shelly Sarver in Pella, IA.  They included: Cinnomon sticks, evergreenry, lemongrass, sage along with saworski green crystals. Very masculine while still having a little bit of "bling" and glitz!  They smelled heavenly!!!  A close up picture of my handsome groom and his suit, and boutonniere -

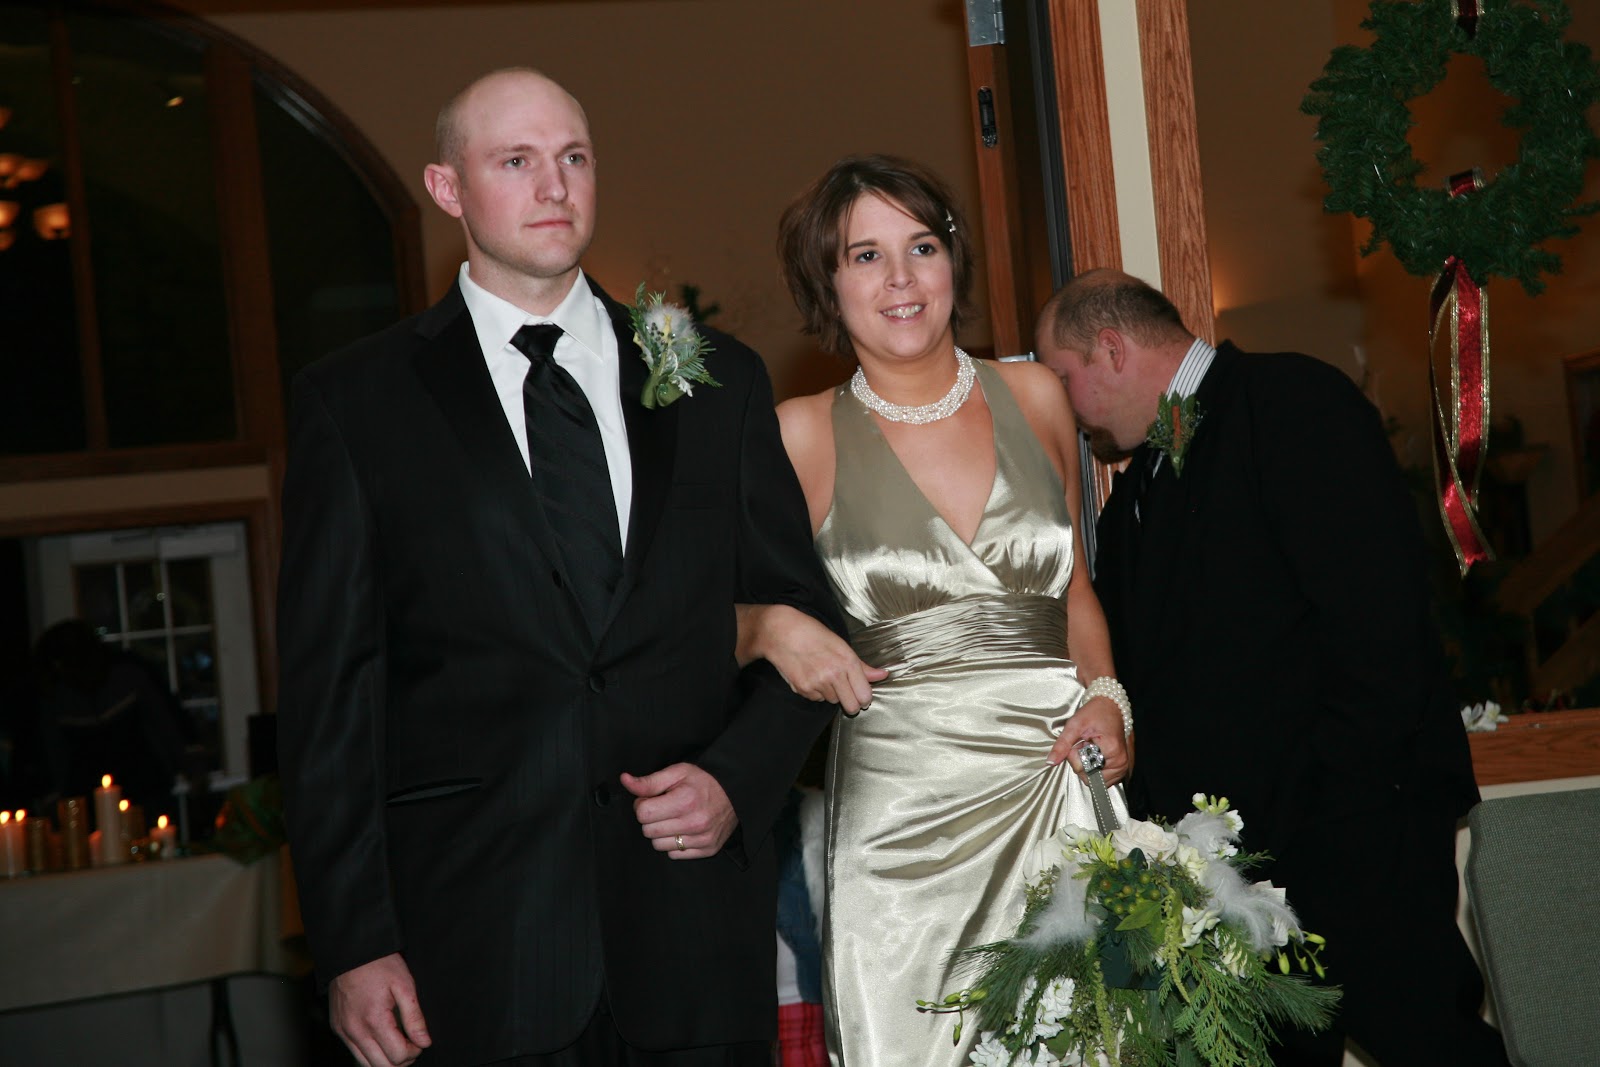
Heres a picture of all the guys together, enjoying themselves!


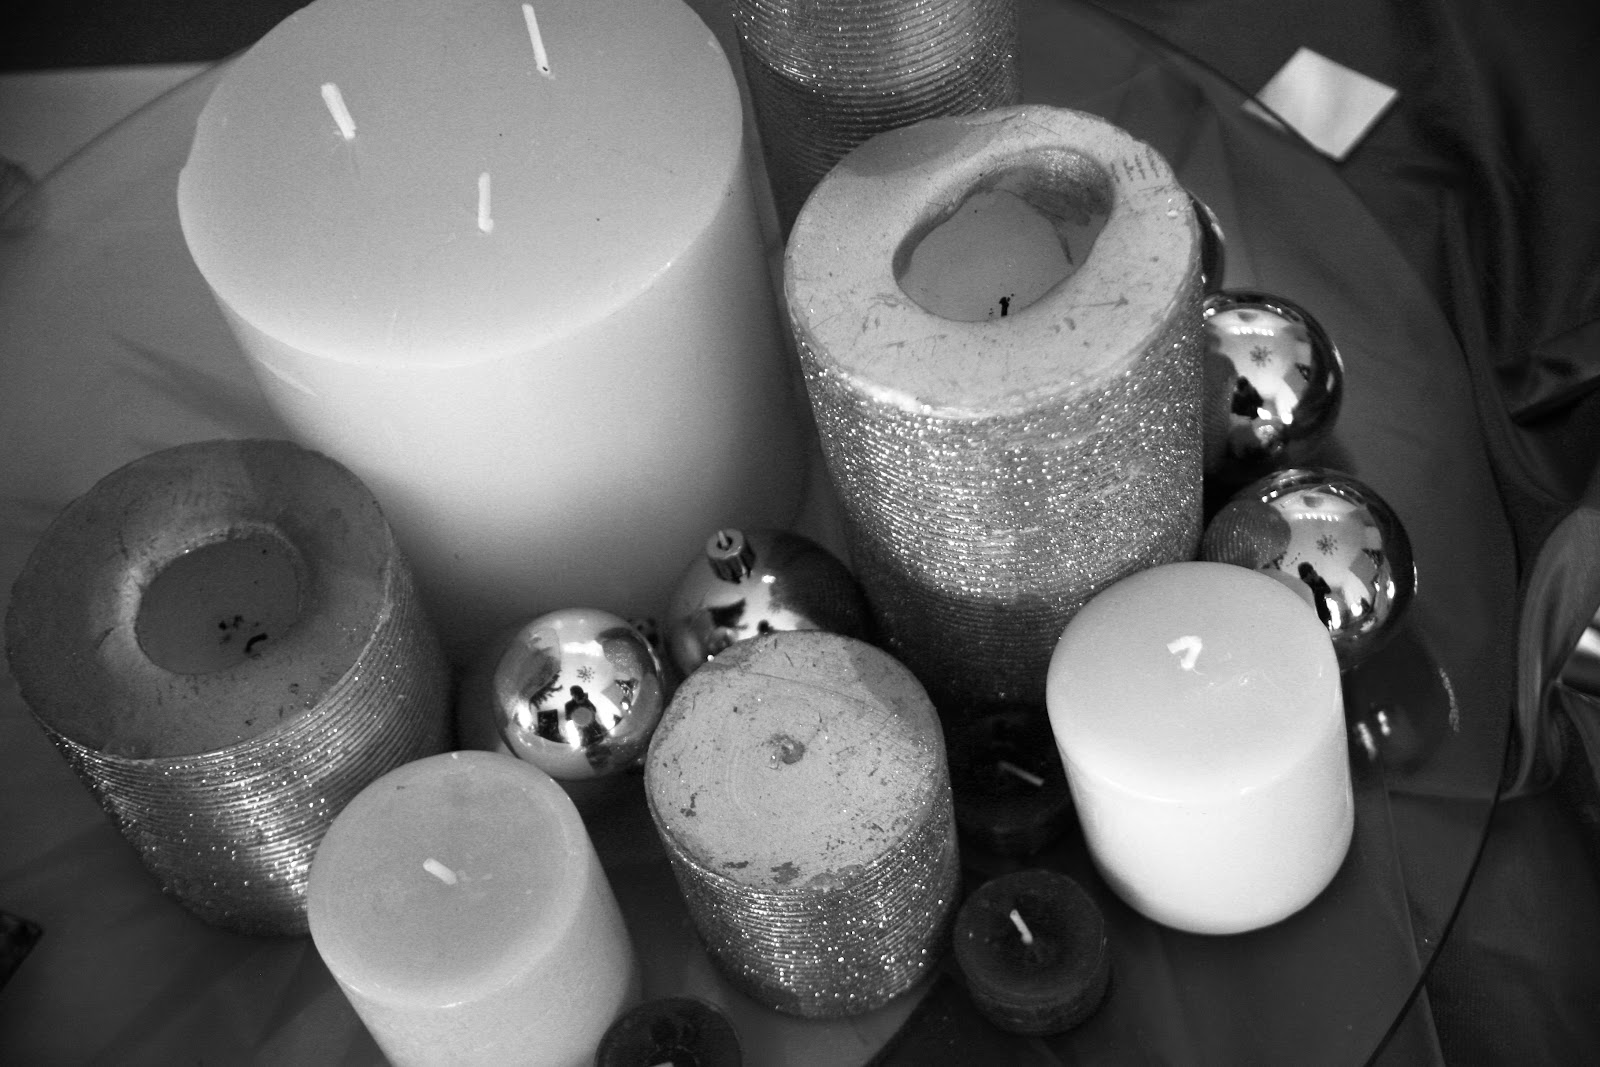
Each row of pews was lit by 3 tiered candles, 2 vanilla cream candles and one cider mill scent from Pilgrim's Primatives (best scent ever!!!!) 
The runner was already pre-laid and pinned to the floor, so guests were seated from the outside rather than seated from the aisle. 


The stage was lined with full length mirrors that were purchased at Walmart and the frames were painted metallic gold.  Various candles filled the mirrors. 


The front of the stage was our unity candle table which held two arrangements of evergreenry, ostrich feathers, cream hydrangeas, spider mums, and cream roses.  (funny tidbit- these got burned by our candles, thankfully they didnt catch on fire!!!)

The 3 tiered candles were on stands that Shawn and his dad welded together.  They were covered with various cream colored draped fabric (I got on clearance at Walmart, and raided my mothers fabric stash!)


In the last blog posting I shared my love of my grandmas church lighting candles together and singing Silent Night...  So... we asked our guests to join in lighting candles around the church while Shawn and I lit our unity candle to signify everyone uniting us in marriage.  It was beautiful to look out into the church and see all the candles lit by our friends and family members!


 Our flower girl and ring bearer were dressed in semi casual clothes, we wanted them to be comfortable, as well as have outfits that could be worn later on as well.  Practical?  YES!!!!! 
Flower girl wore an outfit from the Gap, a red silk plaid skirt, a jean jacket with a cream fur vest.
She pulled a sled that was my fathers down the aisle, adorned with evergreenry and candles that were battery operated, safety first!
 Our ring bearer wore black cords, denium button shirt with a cream colored cable knit sweater.  He carried a red lantern with a candle (battery operated) inside.


Our bridesmaids wore sage green charmuse satin dresses that were just downright SEXY!!!!  Along with gold peep toe shoes, with a HOT 4" heel.  Oh my stars... the ladies looked HOT that night!  My mother in law sewed a fur wrap for them for when they went outside.  They wore a necklace made of 8 strands of creamy fresh water pearls, pearl earrings, a pearl neckalce with swaroski crystals. 

 They carried a pomander ball made of ostrich feathers, evergreenry, cream roses and hydrangeas, cinnomon sticks, rosemeary and sage. 
Their arrangements were embellished with their initial made from Swaroski Crystal. 

 My brother flew in from Seattle WA from his military post to walk me down the aisle.  He said it was a very difficult thing for him to do, but he was honored to have the priveledge. 
He carried a candle down the aisle in memory of my father, which was handed over to my mom when we got to the end of the aisle.  It was a very symbolic way to have my father with me on our special day.

My something borrowed: a brooch from my grandma, it was attached in my flowers.
My something New: My dress
My Something Blue: My initials were on the bottom of my shoes in blue glitter

My bridesmaids, mothers, and others participating in our wedding wrote letters of best wishes and pinned them to the underside of my dress... sending me down the aisle with their love and optimism for a long lasting partnership with Shawn!


My flowers were cream hydrangeas and roses, evergreenry, ostrich feathers and had large rhinestone inserts for the bling.  a picture of my father was also included with my flowers.  See he did walk with me down the aisle!


My hairstyle was inspired by the 1940 finger waves and pin up curls.  I wore crystal inserts in lieu of a veil.  I could never find a veil that complimented my dress, so I skipped the traditional route and showed off my girlfriends amazing talent!  Sonja Morris, you did an outstanding job!!!! 


After the ceremony our guests were given sparklers and matches that read "Come on Baby, Light my Fire!" I am big fan of The Doors, so it was a great way to add a little bit of them to the ceremony. 


Here we are in the limo after the ceremony!  It was my first limo ride, and I was super excited!!!! 


To be continued.......

Monday, December 19, 2011

Sharp/Smothers Wedding Part 1

In honor of my husband and I's 4th year anniversary I thought I would blog a series on our wedding and  share photos from our wedding held on December 15th, 2007.  As a little girl I always dreamed of having a Christmas wedding, the church was always decorated so nicely, and the holiday carols were sung, I loved the romance of the candles in the church windows that were lit during Christmas Eve service, and the cherry on top of it all was Christmas Eve service at my grandma's church, all those attending the service formed a circle around the sancturary and lit candles and sang Silent Night to close out the service.  It is a memory that is forever a tear - jerker for me, so beautiful and so striking, the candles, the unity of the guests, and the wonderous carol.  OHHHH... beautiful goose bumps!
We decided on the date of December 15th, as it was the Saturday closest to my fathers birthday who had recently passed away the year before, his birthday was December 17th. 
The Theme - HOLIDAY GLAMOUR....  1940's hairstyles and make-up, big bling, mixed with the earthly elements that make Christmas special, the spices, the evergreenry and the beautiful striking individuality of the curly willow that sticks out on the winter landscape.
Now the year before some good friends of ours had gotten married on the same weekend (December 16th) and the weather was in the 60's!  Our wedding the weather was the exact opposite!  It not only rained the morning of our wedding, and froze, it then snowed 5 1/2 inches of snow on top.  It made for some gorgeous photos outside, however fairly dangerous for our guests who were traveling. 

We were married at the United Methodist Church in Centerville

In the entry the guest book table took command, the table was decorated with Christmas trees adorned with cream hydrangeas gold ornaments, clear lights and curly willow branches.  The table itself held many various candles, cider mill from prilgrim primitives (the best smell EVER!) mixed with vanilla and cinnamon.  The church smelled like Christmas for sure!  Candles were displayed on full length mirrors with gold and silver metallic ornaments intermixed for filler.  A couple of our engagment photos were on display as well, along with the words "I DO" in the middle to symbolize the awesome adventure we were about in embark on!


Our guests were encouraged to write warm wishes and their names on quilt squares instead of in a traditional guestbook.  Shawn's grandma pieced the squares together, and we now hold this quilt on display in our bedroom, its very special to us!  Guests used fabric pens (green ink of course) which were enhanced from the basic marker look to have glitter and beads and crystals on them.  Its all in the details folks!

Guests were able to place wedding cards in an antique mailbox that I found at a flea market, it was originally adorned with salmon pink flowers which I painted creamy white to match our wedding decor I also added some glitter elements as well....  One can never have enough glitter! 


As the guests traveled thru the foyer and towards the santuary they were greeted by a very close friend of ours at the program table.  Our programs were handmade from cream colored cardstock with rounded edges.  The outside was stamped with the same snowflakes that were on our invites in the colors of olive and sage green.  The inside of the program was adorned with engement photos printed on vellum, the order of the wedding, and crossword puzzles as well as a word search for the guests while they were waiting for the wedding to start.


The programs were held together with little rings that were adorned with miscellaneous ribbons that matched our wedding decor. 

In case you havent noticed, I dont like to have everything matchy matchy.... I think that with the different textures, colors, prints etc that the effect is one of a kind, electic if you will, but cohesive at the same time.
As you make plans for your special day, make sure that you are true to you and your partners style, make your event one that showcases both of you!  Make it unique, remember you are like a snowflake, there is no one else out there like you!!!!!

To be continued....

Wednesday, December 14, 2011

Christmas Decor - Part 3

After going thru our Christmas decorations, I discovered we didnt have a wreath for our front door!  I went searching on Pintrest for ideas.  I found a couple that I really liked, so I decided to combine a few ideas onto one wreath.  Who says it has to be one style?  A little over the top is alright...

I went collecting thru my Christmas decor that was left over, and pulled some supplies, sprigs of red berries, evergreen sprigs with pinecones and green glitter ball ornaments.

Grapevine wreath from Walmart - $3.47
Santa Hat from Walmart - $.97
Ribbons - $2.97 a yard
Snowflakes (foam) in a pkg of 20 - $4.97 (I used the remaining snowflakes to make ornaments for my random acts of Christmas Kindness project)

My trusted miscellaneous ribbons for decorating this year.  This helps keep a cohesive look thru-out our home.


 Pictures of the supplies.  I tried to mix traditional with contemporary and have the wreath showcase alot of textures, nature and alot of  pops of color!

I stuffed the Santa Hat with paper towels to create depth and I added zebra print ribbon as a band.
Then I started layering away! 
I tied the ribbons in a random pattern, trying to alternate stripes, polka dots, animal prints, and glittered ribbons.
 I then inserted the greenery and the berries
Using hot glue I fastened the snowflakes, santa hat, and the ornaments to the wreath. 


Monday, December 5, 2011

Smothers Christmas Decor Part 2

Part 2 of our easy breezy Christmas Decorating! 


An easy dress up for your entryway chandelier!  Wrap a garland around the lights, jazz the greenery up with berry inserts (sprigs) and some ribbon.  I purchased the lime green ribbon from Walmart for $2.97 a roll.  You will see this ribbon many times over in our house. 

An easy fix for your celing fans in your bedroom.... Hang ornaments off of miscellaneous ribbons in coordinating colors. 

Lets not forget your bathrooms folks!!!!  You can tie the same ornaments used in the bedroom in the bathroom for a coordinating theme.  I tied these ribbons to the the shower curtain hooks. 


Here's a close up pic of the entry way light decor....

We have a bay window in our dinning room, a nice easy way to carry on the ornament theme, I tied ornaments on the miscellaneous ribbon, I did use bigger ornaments in this opening as the bay area is larger and the ornaments will fill this easier without seeming "over the top".  I strung 2 strands of star lights over the curtain rod to add additional variation and to fill the gaps between the ribbons. 


I decided to showcase our lantern collection this year in our bay.  The red lantern was carried by our ring bearer in our wedding, this features an battery powered candle as well as the various ribbons found around our house.
The candle in the largest lantern is a candle that is in memory of my father who passed away several years ago.  This candle was also lit at our wedding.  I filled the latern base with remaining bulbs to tie in the ornaments hanging above. 
I placed 4 sprigs of berries around the base of all the lanterns to tie collection together and to create a "base".

Simple Kitchen arrangement.  Nice and easy, and out of the way of cooking and baking.  This can be kept up all winter if desired as it sports a nice Winter theme instead of strictly Christmas decor.

Friday, December 2, 2011

Christmas Decor

It's Christmas time at the Smothers' household! 

Several of my girlfriends have asked me for tips on decorating for Christmas.  Everyone has their own style and color combonations that they like for their homes.  I believe the theories behind each style is the same though.  My main goal when decorating a home for Christmas is: Keep it simple, classic, and cohesive (one theme thru the whole house.)

1.) Layer your tree, lights, garland, ornaments, sprigs for filler, tree topper

2.) Add texture to your tree.  Either with 3-D elements that "POP!" out at you, thick ribbons and garlands, Feather Boas, perhaps curly willow for a more natural woodsy look.  Make your tree more texturized, especially if its a fake tree. 


3.) Balance your ornaments - if you use colored balls on your tree, use the theroy of "power of 3" when placing them on the branches.  Choose 3 coordinating colors of decorations (mine is Lime Green, Red, and White)  Try to place the 3 colors around each other in a grouping.  Never the same color besides each other though.    Place your special ornaments such as items your children have made in between the 3 ball grouping to break up the pattern. 
4.) Tree Topper - So many options for your topper, we have a snowmans hat that is whimsical and fun for Children.  If you are into floral options, fun choices include feathers making a "crowned" affect at the top of the tree and then adding floral sprigs in front of the feathers to complete the look. This is like a womans hair... its her crowning glory - or the tree's crowning glory in this case.  Pick or create a topper that glues your decor together while really making a WOW statement at the same time. 
5.) Depth - Adding depth to a tree is super simple, if you place some ornaments farther back on your branches this creates the illusion of a HUGE tree, one with deep branches.  Be sure to place the ornaments so you and your family can still admire them. 

Finished Product....

Our entry way in our house has a little nook that needed a touch of Christmas Cheer, one that welcomed guests when they came into our home.  This is the nook decor.... easy peezy... just empty boxes wrapped in gift wrap that coordinat with our tree decor.  This is also the same wrapping paper that we are using this year for under our tree for our gifts. 

Enjoy these decorating tips!  Please feel free to share your ideas for decorating!